FAQ #
Each assignment will have an FAQ linked at the top. You can also access it by adding “/faq” to the end of the URL. The FAQ for Lab 12 is located here.
The slides for Lab 12 can be found here.
Introduction #
This lab will help you with Project 3: Build Your Own World (BYOW). The first part will teach you how to use a set of “tiles” to generate shapes on your screen. This will apply to building the rooms, hallways, and other features of your world in Project 3. Next week’s lab will teach you more about how to use the StdDraw package to make a fun text-based game. This will help you build the main menu and other text-based elements of Project 3. It will also teach you how to achieve user interactivity, which is vital to Project 3!
Pre-lab #
Some steps to complete before getting started on this lab:
-
As usual, use
git pull skeleton main - Watch a previous semester’s project 3 getting started video at this link.
-
Note the name and API have changed slightly, but the bigger picture still applies.
-
Understand that project 3 will be a marathon and not a sprint. Don’t wait until the last minute. You and your partner should start thinking about your design NOW.
- Read over Phase 1 of the project 3 spec.
In the first half of this lab, you and your partner will learn some basic techniques and tools that will be helpful for project 3.
Part I: Meet the Tile Rendering Engine #
Boring World #
Open up the skeleton and check out the BoringWorldDemo file. Try running
it and you should see a window appear that looks like the following:
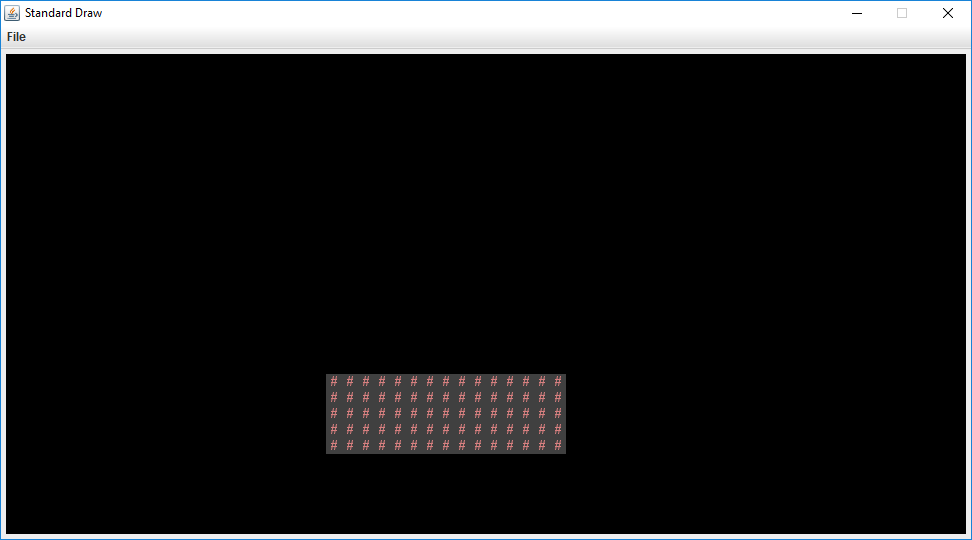
This world consists of empty space, except for the rectangular block near the bottom middle. The code to generate this world consists of three main parts:
- Initializing the tile rendering engine.
- Generating a two dimensional
TETile[][]array. - Using the tile rendering engine to display the
TETile[][]array.
The API for the tile rendering engine is simple. After creating a TERenderer
object, you simply need to call the initialize method, specifying the width
and height of your world, where the width and height are given in terms of the
number of tiles. Each tile is 16 pixels by 16 pixels, so for example, if we
called ter.initialize(10, 20), we’d end up with a world that is 10 tiles wide
and 20 tiles tall, or equivalently 160 pixels wide and 320 pixels tall. For this
lab, you don’t need to think about pixels, though you’ll eventually need to when
you start building the user interface for Project 3 (discussed in the next lab).
TETile objects are also quite simple. You can either build them from scratch
using the TETile constructor (see TETile.java), or you can choose from a
palette of pregenerated tiles in the file Tileset.java. For example, the code
from BoringWorldDemo.java below generates a 2D array of tiles and fills them
with the pregenerated tile given by Tileset.NOTHING.
TETile[][] world = new TETile[WIDTH][HEIGHT];
for (int x = 0; x < WIDTH; x++) {
    for (int y = 0; y < HEIGHT; y++) {
        world[x][y] = Tileset.NOTHING;
    }
}
Of course, we can overwrite existing tiles. For example, the code below from
BoringWorld.java creates a 14 x 4 tile region made up of the pregenerated tile
Tileset.WALL and writes it over some of the NOTHING tiles created by the
loop code shown immediately above.
for (int x = 20; x < 35; x++) {
    for (int y = 5; y < 10; y++) {
        world[x][y] = Tileset.WALL;
    }
}
Note that $(0, 0)$ is the bottom-left corner of the world in this case (not the top-left as you may be used to).
The last step in rendering is to simply call ter.renderFrame(world), where
ter is a TERenderer object. Changes made to the tiles array will not appear
on the screen until you call the renderFrame method.
Try changing the tile specified to something else in the Tileset class other
than WALL and see what happens. Also experiment with changing the constants in
the loop and see how the world changes.
Note: Tiles themselves are immutable! You cannot do something like
world[x][y].character = 'X'.
Why do we initialize the world to Tileset.NOTHING, rather than just leaving it
untouched? The reason is that the renderFrame method will not draw any tiles
that are null. If you don’t initialize the world to Tileset.NOTHING, you’ll
get a NullPointerException when you try to call renderFrame.
Random World #
Now open up RandomWorldDemo.java. Try running it and you should see something like this:
This world is sheer chaos – walls and flowers everywhere! If you look at the RandomWorldDemo.java file, you’ll
see that we’re doing a few new things:
- We create and use an object of type
Randomthat is a “pseudorandom number generator”. - We use a new type of conditional called a
switchstatement. - We have delegated work to functions instead of doing everything in
main.
A random number generator does exactly what its name suggests, it produces an
infinite stream of numbers that appear to be randomly ordered. The Random
class provides the ability to produce pseudorandom numbers for us in Java.
For example, the following code generates and prints 3 random integers:
Random r = new Random(1000);
System.out.println(r.nextInt());
System.out.println(r.nextInt());
System.out.println(r.nextInt());
We call Random a pseudorandom number generator because it isn’t truly
random. Underneath the hood, it uses cool math to take the previously generated
number and calculate the next number. We won’t go into the details of this math,
but see Wikipedia
if you’re curious. Importantly, the sequence generated is deterministic, and the
way we get different sequences is by choosing what is called a “seed”. If you
start up a pseudorandom generator with a particular seed, you are guaranteed to
get the exact sequence of random values.
In the above code snippet, the seed is the input to the Random constructor, so
1000 in this case. Having control over the seed is pretty useful since it
allows us to indirectly control the output of the random number generator. If we
provide the same seed to the constructor, we will get the same sequence values.
For example, the code below prints 4 random numbers, then prints the SAME 4
random numbers again. Since the seed is different than the previous code
snippet, the 4 numbers will likely be different than the 3 numbers printed
above. This is super helpful in Project 3, as it will give us deterministic
randomness: your worlds look totally random, but you can recreate them
consistently for debugging (and grading) purposes.
Random r = new Random(82731);
System.out.println(r.nextInt());
System.out.println(r.nextInt());
System.out.println(r.nextInt());
System.out.println(r.nextInt());
r = new Random(82731);
System.out.println(r.nextInt());
System.out.println(r.nextInt());
System.out.println(r.nextInt());
System.out.println(r.nextInt());
In the case a seed is not provided by the user/programmer, i.e.
Random r = new Random(), random number generators select a seed using some
value that changes frequently and produces a lot of unique values, such as the
current time and date. Seeds can be generated in all sorts of other stranger
ways, such as
using a wall full of lava lamps.
For now, RandomWorldDemo uses a hard coded seed, namely 2873123, so it will
always generate the exact same random world. You can change the seed if you want
to see other random worlds, though given how chaotic the world is, it probably
won’t be very interesting.
The final and most important thing is that rather than doing everything in
main, our code delegates work to functions with clearly defined behavior.
This is critically important for your project 3 experience! You’re going to want
to constantly identify small subtasks that can be solved with clearly defined
methods. Furthermore, your methods should form a hierarchy of abstractions!
We’ll see how this can be useful in the final part of this lab.
Part II: Use the Tile Rendering Engine #
Knight World Intro #
If you’re unfamiliar with the knight from chess, it moves in an “L”-shape, two squares in one direction and one square in a perpendicular direction. For example, the knight can move from the center square to any of the squares marked with an “X” in the diagram below.
We’ve seen how we can draw a world and generate randomness. Your task for this
lab is to use the tile generator we’ve seen to draw a world like the one below,
where each hole is a knight’s move away from the closest neighboring holes (note
that we’ve only included every other square instead of all eight to create a
pleasing repeating pattern). For this example, we’ve used Tileset.NOTHING to
represent holes and a grey version of Tileset.LOCKED_DOOR to represent floor
tiles, but you can use any tilesets you’d like.
The location of the specific holes is flexible, as long as the hole pattern is correct (e.g. translating each of the holes in the image below one square to the left is also valid).
You should be able to draw differently-sized knight worlds. The picture above contains size-4 holes; below are worlds consisting of size-1, size-2, and size-3 holes, respectively.

In the actual Project 3, you’ll be generating random worlds with rooms and hallways. While this lab task does not directly apply to the project, it will familiarize you with the tile rendering engine and also help you think about how you can take complex drawing tasks and break them into simpler pieces.
Drawing a Knight World #
There are many possible ways to accomplish this task. We’ve provided an
extremely basic skeleton with an unimplemented constructor and main method for
you to fill in. You can find this skeleton in KnightWorld.java. You should be
able to run this file and see a blank world.
If you run this file without any changes, you’ll run into a
NullPointerException (refer here to see why).
We’ve included the tiles instance variable and a getTiles method to render
your world. Feel free to modify the skeleton as you deem fit.
Managing Complexity #
-
You should absolutely not do everything in a nested for loop with no helper methods. While it is technically possible to do this, you will melt your brain. Without hierarchical abstraction, your mind will transform into a pile of goo under the weight of all the complexity.
-
The DRY (Don’t-Repeat-Yourself) and encapsulation principles are ubiquitous in software engineering. If you find yourself repeating something over and over again, you should probably treat it as its own thing.
-
Don’t hardcode! Wherever possible, you should use variables, methods, and/or classes to represent a larger concept whenever things get unwieldy or there is some arbitrary choice being made. Look for patterns in the given example images above to help you identify what you should be abstracting.
-
If you find yourself repeatedly trying an approach that isn’t working, don’t be afraid to completely scrap your code and try something else (but commit your work first!). You can always restore back to a previous commit.
If you’re stuck, here are some hints. As usual, please try to solve it on your own first.
Hint 1
What depends on the holeSize given? What doesn’t?
Hint 2
Are holes really that different from floors? Is there a way to draw them both without introducing too much complexity?
Hint 3
It will probably be helpful to have something that allows you to draw a square of a specified size somewhere in the world. How can you use this to draw a hole or floor tile?
Hint 4
Holes repeat every five squares (relative to the hole size). Can you extrapolate this pattern to the entire world?
Hint 5
This hint gives away a lot and promotes a certain approach, so only read it if you’re legitimately stuck. You’ve been warned!
To decipher the hint, translate the following hexadecimal numbers to ASCII, twice. (You should probably Google a hex-to-ASCII converter.)
34 43 20 36 46 20 36 46 20 36 42 20 32 30 20 36 31 20 37 34 20 32 30 20 36 31
20 36 45 20 37 39 20 32 30 20 36 37 20 36 39 20 37 36 20 36 35 20 36 45 20 32
30 20 33 35 20 37 38 20 33 35 20 32 30 20 36 32 20 36 43 20 36 46 20 36 33 20
36 42 20 32 30 20 36 46 20 36 36 20 32 30 20 37 33 20 37 31 20 37 35 20 36 31
20 37 32 20 36 35 20 37 33 20 32 30 20 32 38 20 37 32 20 36 35 20 36 43 20 36
31 20 37 34 20 36 39 20 37 36 20 36 35 20 32 30 20 37 34 20 36 46 20 32 30 20
37 34 20 36 38 20 36 35 20 32 30 20 36 38 20 36 46 20 36 43 20 36 35 20 32 30
20 37 33 20 36 39 20 37 41 20 36 35 20 32 39 20 32 30 20 36 39 20 36 45 20 32
30 20 37 34 20 36 38 20 36 35 20 32 30 20 36 35 20 37 38 20 36 31 20 36 44 20
37 30 20 36 43 20 36 35 20 32 30 20 36 39 20 36 44 20 36 31 20 36 37 20 36 35
20 37 33 20 32 45 20 32 30 20 34 34 20 36 46 20 32 30 20 37 39 20 36 46 20 37
35 20 32 30 20 36 45 20 36 46 20 37 34 20 36 39 20 36 33 20 36 35 20 32 30 20
36 31 20 36 45 20 37 39 20 37 34 20 36 38 20 36 39 20 36 45 20 36 37 20 32 30
20 36 39 20 36 45 20 37 34 20 36 35 20 37 32 20 36 35 20 37 33 20 37 34 20 36
39 20 36 45 20 36 37 20 33 46
Moving on to Project 3 #
In theory, this lab has taught you everything you need to know for Project 3! The process of generating your world will be similar in many ways to drawing a knight world, though Project 3 world generation will be considerably more complex. Read over Phase 1 of the project 3 spec.
Take a look at the questions in project3prep.md. Feel free to discuss with
your partner or a TA before jotting down your answers.
Checkoff #
Once you have finished KnightWorld and have answered the questions in
project3prep.md, you can check off with a staff member in lab. You will be
asked to show your world, change the world dimensions, change the hole size, and
answer some questions about your code and project3prep.md file. If your work
is satisfactory, they’ll give you a magic word to put into magic_word.txt and
you’ll be done!
If you’re not able to make it to lab this week for a checkoff, please attend an OH block or make a private post on Ed and fill out the checkoff template. We’ll get back to you as soon as we can.
Submission #
You’ll be submitting your completed project3prep.md file and magic_word.txt
to Gradescope. You will get full credit as long as these are filled out and
submitted!