FAQ #
Each assignment will have an FAQ linked at the top. You can also access it by adding “/faq” to the end of the URL. The FAQ for Project 2b is located here.
Due 3/24/23 #
In this project, you’ll complete your implementation of the NGordnet tool.
Unlike Project 2a, the implementation for this part of the project is very open-ended. Deciding on an overall design is an important skill that we’ll also revisit in Project 3. The number of lines of code for this project isn’t necessarily large, but there are a lot of independent decisions that you’ll need to make along the way.
As this is a quite new project, there may be occasional bugs or confusions with the spec. If you notice anything of this sort, please post on Ed.
Project Setup #
THE SETUP FOR THIS PROJECT IS DIFFERENT THAN THE OTHER LABS / PROJECTS. PLEASE DO NOT SKIP THIS STEP!
Group Repository Setup #
As mentioned earlier, you’ll be working exclusively in a group repository for this portion of the project. To set this group repo up on your local computer, follow the instructions below (these are also in the spec):
- Go to your email and accept the GitHub repo invite that you should have received.
- Log in to Beacon, and click on the “Groups” tab. You should have a group listed here.
- Click the “View Repository on GitHub” link.
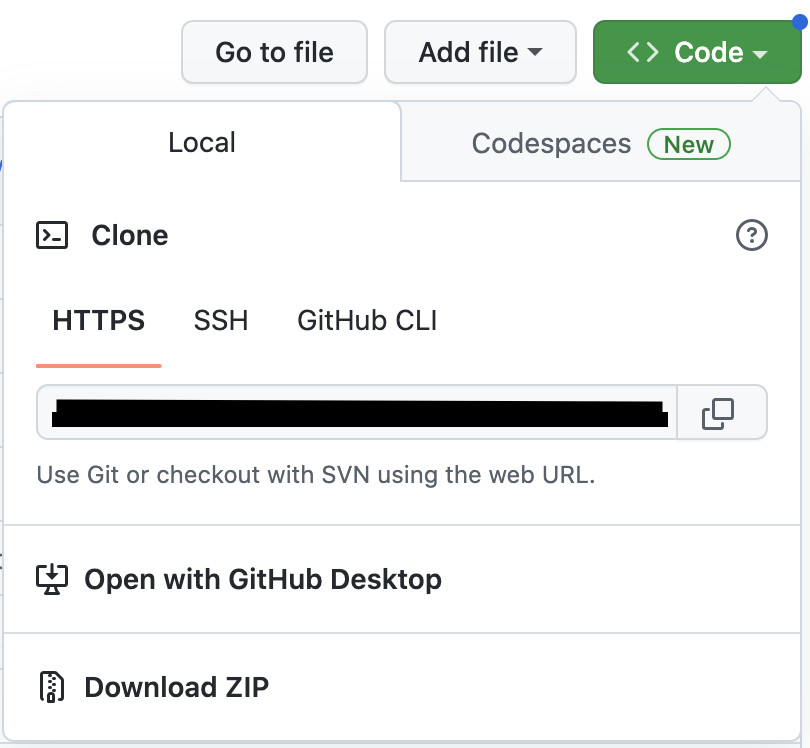
- You’ll now be taken to your new repository on GitHub. Click the green “Code” button in the top right corner (shown below) and copy the clone link shown in the text bar (blacked out in the screenshot).
- Open a new Terminal window, and navigate to the directory that you store your CS 61B files in (usually, students have a directory called
cs61b).
IMPORTANT: Do not cd into your sp23-s**** repo! You should not be cloning the group repo inside of your personal 61b one.
- Type the following commands into your terminal, and hit Enter after each one:
git clone <paste your link from GitHub here>
cd sp23-proj2b-g***  // Replace the *** here with your group repo number
git remote add skeleton https://github.com/Berkeley-CS61B/proj2b-skeleton-sp23.git
git pull skeleton main --allow-unrelated-histories
Once you’ve completed the above steps, you should see your new group repo called sp23-proj2b-g*** in your local files, and if you open this repo, you’ll see the proj2b skeleton folder. From here, you and your partner can proceed as normal, by adding, committing, pushing, and pulling from this repo as you would otherwise.
Skeleton Setup #
- Similar to other assignments in this class, run
git pull skeleton mainin your group repo to get the skeleton code for this project.- NOTE: You’ll notice that this skeleton is (almost) the exact same as the Project 2A skeleton. Rather than having
you use your own implementations of
TimeSeries,NGramMap,HistoryTextHandler, andHistoryHandler, we’ve instead provided you with working (and obfuscated) implementations of these classes inlibrary-sp23(see the next step). - Our provided
NGramMapclass has the behavior that if you call a function likecountHistorybut there are no valid words in the time frame specified, e.g.TimeSeries ts = ngm.countHistory("gwexlbexl", 1900, 1950);, then the resultingtsis just an emptyTimeSeries, i.e. a map with an emptykeySet.
- NOTE: You’ll notice that this skeleton is (almost) the exact same as the Project 2A skeleton. Rather than having
you use your own implementations of
- To get the new library,
cdinto yourlibrary-sp23directory and rungit pull. Then, import all the libraries fromlibrary-sp23into this project like you normally would.- Now that you’ve pulled and imported the libraries, you’ll notice that the code in Main.java (including the lines
that use
NGramMap) should no longer be red.
- Now that you’ve pulled and imported the libraries, you’ll notice that the code in Main.java (including the lines
that use
- Download the new
datafiles for this project using this link and move them into yourproj2bfolder on the same level asngordnet.
Once you are done, your proj2b directory should look like this:
proj2b
├── data
│   ├── ngrams
│   └── wordnet
├── ngordnet
├── static
Getting Started #
IMPORTANT NOTE: You should really complete LAB 9 first before starting coding, or even designing your project. We think this would be helpful.
The course staff has created a couple of introductory videos to the project and the starter code available here.
We’ve also created two wonderful tools that you can (and should!) use to explore the dataset, see how the staff solution behaves for specific inputs, and get expected outputs for your unit tests (see Testing Your Code). We’ll link them here, as well as in other relevant parts of the spec.
- Wordnet Visualizer: Useful for visually understanding how synsets and hyponyms work and testing different words/lists of words for potential test case inputs. Click on the “?” bubbles to learn how to use the various features of this tool!
- Staff Solution Webpage: Useful for generating expected outputs for different test case inputs. Use this to write your unit tests!
Partnership Details #
Project 2B is a partner-based project! This means that you’ll be working with one other CS61B student in a special group GitHub repository that both of you will have access to. All submissions to this project must only come from this group repository, and you can submit to either your own or your partner’s repo; please read the info in Partnership Submissions for more about this.
The first step in the partnership process is to fill out the Project 2B Partnership Preferences Form. If you already have a partner in 61B that you’d like to work with, you can indicate that in this form; otherwise, the form will ask you to fill out some partner preferences so that we can match you with someone who is most compatible with your work habits.
Task: Fill out the Project 2B Partnership Preferences Form.
This form is due on Sunday, March 12th at 11:59PM. After this due date, we will match everyone and release partner repository details.
If you do not fill out the form by the due date above, we will be matching you with someone at random. There are no exceptions to this rule, even if you already have a partner in mind. Thus, if you do want to work with someone in particular (or if you want to be matched based on your preferences), make sure to fill out the form on time!!
Using the WordNet Dataset #
Before we can incorporate WordNet into our project, we first need to understand the WordNet dataset.
WordNet is a “semantic lexicon for the English language” that is used extensively by computational linguists and cognitive scientists; for example, it was a key component in IBM’s Watson. WordNet groups words into sets of synonyms called synsets and describes semantic relationships between them. One such relationship is the is-a relationship, which connects a hyponym (more specific synset) to a hypernym (more general synset). For example, “change” is a hypernym of “demotion”, since “demotion” is-a (type of) “change”. “change” is in turn a hyponym of “action”, since “change” is-a (type of) “action”. A visual depiction of some hyponym relationships in English is given below:

Each node in the graph above is a synset. Synsets consist of one or more words in English that all have the same meaning. For example, one synset is “jump, parachuting” , which represents the act of descending to the ground with a parachute. “jump, parachuting” is a hyponym of “descent”, since “jump, parachuting” is-a “descent”.
Words in English may belong to multiple synsets. This is just another way of saying words may have multiple meanings. For example, the word “jump” also belongs to the synset “jump, leap” , which represents the more figurative notion of jumping (e.g. a jump in attendance) rather the literal meaning of jump from the other synset (e.g. a jump over a puddle). The hypernym of the synset “jump, leap” is “increase”, since “jump, leap” is-an “increase”. Of course, there are other ways to “increase” something: for example, we can increase something through “augmentation,” and thus it is no surprise that we have an arrow pointing downwards from “increase” to “augmentation” in the diagram above.
Synsets may include not just words, but also what are known as collocations. You can think of these as single words that occur next to each other so often that they are considered a single word, e.g. nasal_decongestant . To avoid ambiguity, we will represent the constituent words of collocations as being separated with an underscore _ instead of the usual convention in English of separating them with spaces. For simplicity, we will refer to collocations as simply “words” throughout this document.
A synset may be a hyponym of multiple synsets. For example, “actifed” is a hyponym of both “antihistamine” and “ nasal_decongestant”, since “actifed” is both of these things.
If you’re curious, you can browse the Wordnet database by using the web interface , though this is not necessary for this project.
Hyponyms (Basic Case) #
Setting up a HyponymsHandler #
-
In your web browser, open the
ngordnet.htmlfile in thestaticfolder. You’ll see that there is a new button: “ Hyponyms”. Note that there is also a new input box calledk. -
Try clicking the Hyponyms button. You’ll see nothing happens (and if you open the developer tools feature of your web browser, you’ll see that your browser shows an error).
In Project 2B, your primary task is to implement this button, which will require reading in a different type of dataset and synthesizing the results with the dataset from Project 2A. Unlike 2A, it will be entirely up to you to decide what classes you need to support this task.
- Start by opening your
ngordnet.main.Main.javafile. - Create a new file called
HyponymsHandlerthat simply returns the word “Hello!” when the user clicks the Hyponyms button in the browser. You’ll need to create a newHyponymsHandlerclass that extends theNgordnetQueryHandlerclass. See your other Handler classes for examples. Make sure when you register your handler that you use the string “hyponyms” as the first argument to theregistermethod, and not “hyponym”. - Once you’ve modified
Mainso that your new handler is registered to handle hyponyms requests, start upMainand try clicking the Hyponyms button in your web browser again. You should see text appear that says “Hello”.
Hyponyms Handler (Basic Case) #
Next, you’ll create a partial implementation of the Hyponyms button. For now, this button should:
- Assume that the “words” entered is only a single word.
- Ignore startYear, endYear, and k.
- Return a string representation of a list of the hyponyms of the single word, including the word itself. The list should be in alphabetical order, with no repeated words.
For example, suppose the WordNet dataset looks like the diagram below (given to you as the input files synsets11.txt
and hyponyms11.txt). Suppose that the user enters “descent” and clicks on the Hyponyms button.
In this case, the output of your handler should be the string representation of a list containing “descent”, “jump”
and “
parachuting”, i.e [descent, jump, parachuting]. Note that the words are in alphabetical order.
As another example, suppose we’re using a bigger dataset such as the one below (given to you as the input
files synsets16.txt and hyponyms16.txt):
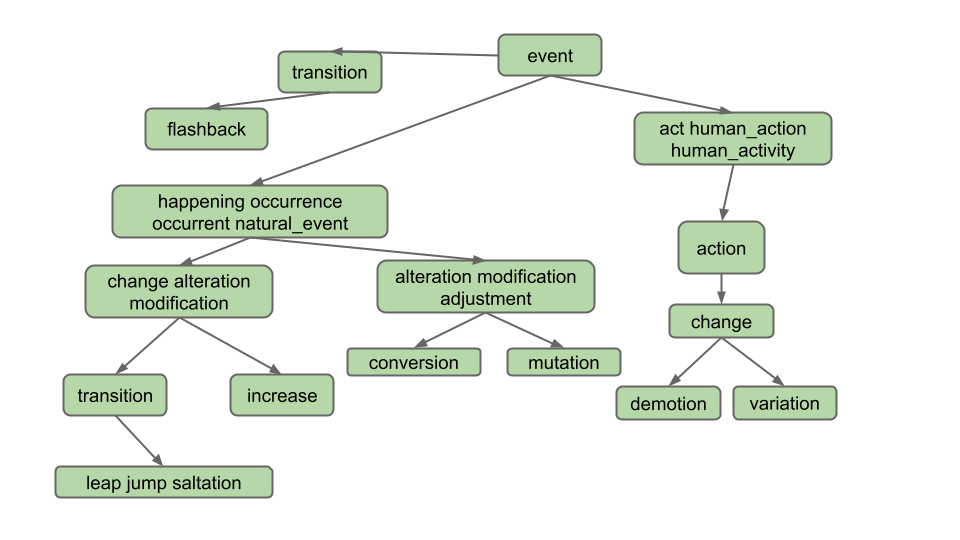
Suppose the user enters “change” and clicks on the Hyponyms button. In this case, the hyponyms are all the words in the blue nodes in the diagram below:
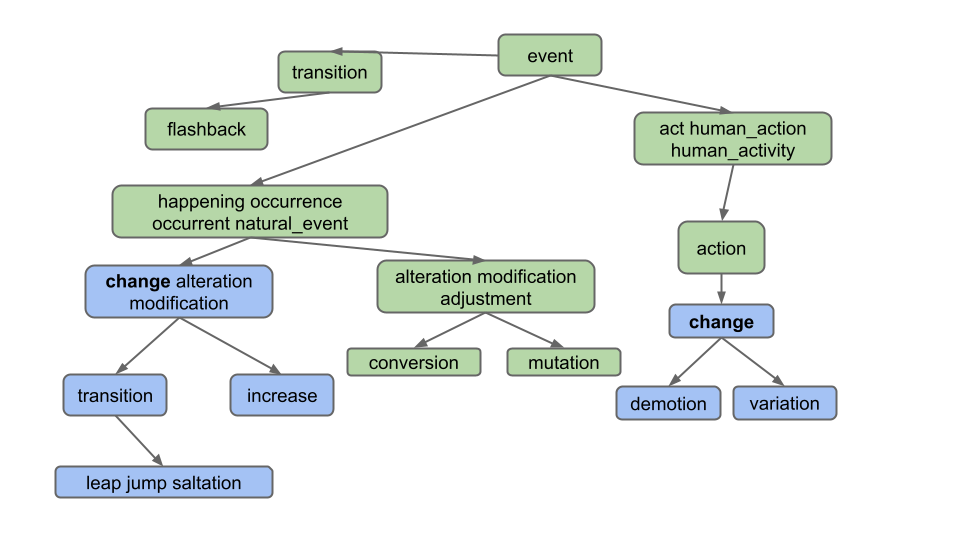
That is the output
is [alteration, change, demotion, increase, jump, leap, modification, saltation, transition, variation]. Note that
even though “change” belongs to two different synsets, it only appears once.
Note: Don’t overthink this and make life harder than it needs to be. Specifically, observe that the output does not include:
- Synonyms of synonyms (e.g. does not include adjustment)
- Hyponyms of synonyms (e.g. does not include conversion)
- Hyponyms of other definitions of hyponyms (e.g. does not include "flashback", which is a hyponym of another definition of "transition")
Task: Create and implement HyponymsHandler.java and any helper classes.
Note: Please read the tips below, since you shouldn’t be writing all of your code in this class.
To complete this task, you’ll need to decide what classes you need to create to support the HyponymHandler. DO NOT
DO ALL THE WORK IN HYPONYMS HANDLER. Instead, you should have helper classes. For example, to handle the “History”
button, we created an NGramMap class. You’ll want to do something similar.
You’ll also need to understand the input format of the WordNet dataset. This description is given in the section below.
For this part, you may NOT import any existing graph library into your code. That is you can’t import, for example, the graph implementations from the optional Princeton algorithms textbook. Instead, you should build your own graph class or classes.
Tips #
- Just like NGramMap, you’ll want your helper classes to only parse the input files once, in the constructor. DO NOT CREATE METHODS WHICH HAVE TO READ THE ENTIRE INPUT FILE EVERY TIME THEY ARE CALLED. This will be too slow!
- We strongly recommend creating at least two classes for this part of the project as follows: One which implements the idea of a directed graph. One which reads in the WordNet dataset and constructs an instance of the directed graph class. This second class should also be able to take a word and return its hyponyms. You may also want additional helper classes that represent the idea of a traversal but this is not required - you can implement your traversal within your graph class as well.
- Don’t worry about writing Truth tests yet, we’ll talk about how to do that later in the spec. Simply use the web front
end to check the two input examples (“descent” and “change”) from the diagrams above for
synsets16.txtandhyponyms16.txt. - While you can (and should) write unit tests for the helper classes/methods that you create for this project, another
good way to test and see what’s going on with your code is to simply run
Main.java, openngordnet.html, enter some inputs into the boxes, and click the “Hyponyms” button. You may find visual debugging can lead to some useful discoveries in this project. - Because of the obfuscation that we applied to the Project 2a files (in particular, TimeSeries and NGramMap), the argument name previews when using these classes in IntelliJ may look a little weird. You may see long, random strings; these are intentional in order to obfuscate the code, and they do not represent an issue with your own code in any way.
WordNet File Format #
We now describe the two types of data files that store the WordNet dataset. These files are in comma separated format, meaning that each line contains a sequence of fields, separated by commas.
-
File Type #1: List of noun synsets. The file
synsets.txt(and other smaller files withsynsetin the name) lists all the synsets in WordNet. The first field is the synset id (an integer), the second field is the synonym set (or synset), and the third field is its dictionary definition. For example, the line6829,Goofy,a cartoon character created by Walt Disneymeans that the synset
{ Goofy }has an id number of 6829, and its definition is “a cartoon character created by Walt Disney”. The individual nouns that comprise a synset are separated by spaces (and a synset element is not permitted to contain a space). The S synset ids are numbered 0 through S − 1; the id numbers will appear consecutively in the synset file. The id numbers are useful because they also appear in the hyponym files, described as file type #2. -
File Type #2: List of hyponyms. The file
hyponyms.txt(and other smaller files with hyponym in the name) contains the hyponym relationships: The first field is a synset id; subsequent fields are the id numbers of the synset’s direct hyponyms. For example, the following line79537,38611,9007means that the synset 79537 (“viceroy vicereine”) has two hyponyms: 38611 (“exarch”) and 9007 (“Khedive”), representing that exarchs and Khedives are both types of viceroys (or vicereine). The synsets are obtained from the corresponding lines in the file
synsets.txt:79537,viceroy vicereine,governor of a country or province who rules... 38611,exarch,a viceroy who governed a large province in the Roman Empire 9007,Khedive,one of the Turkish viceroys who ruled Egypt between...There may be more than one line that starts with the same synset ID. For example, in
hyponyms16.txt, we have11,12 11,13This indicates that both synsets 12 and 13 are direct hyponyms of synset 11. These two could also have been combined on to one line, i.e. the line below would have the exact same meaning, namely that synsets 12 and 13 are direct hyponyms of synset 11.
11,12,13You might ask why there are two ways of specifying the same thing. Real world data is often messy, and we have to deal with it.
Suggested Steps to Take #
To get the “Hyponyms” button working you’ll need to:
- Develop a graph class. If you aren’t familiar with this data structure, take a look at lectures 21 and 22. You
should test this with operations that are independent of the given data files. For example, my tests evaluated that
my
createNodeandaddEdgefunctions yielded appropriate graphs by using my graph classes’sgetNodesandneighborsfunctions. - Write code that converts the WordNet dataset files into a graph. This could be part of your graph class, or it could be a class that uses your graph class.
- Write code that takes a word, and uses a graph traversal to find all hyponyms of that word in the given graph.
We strongly recommended writing tests that evaluate queries on the examples above (for example, you might look at the hyponyms of “descent” in synsets11/hypernyms11, or the hyponyms of “change” in synsets16/hypernyms16).
Tests should be written at a level of abstraction appropriate to what they’re evaluating. For example, I have a class
called TestGraph that evaluates various aspects of my Graph class.
Or as another example, my code has a class called TestWordNet containing the function below.
@Test
public void testHyponymsSimple(){
        WordNet wn=new WordNet("./data/wordnet/synsets11.txt","./data/wordnet/hyponyms11.txt");
        assertThat(wn.hyponyms("antihistamine")).isEqualTo(Set.of("antihistamine","actifed"))
        }
Note your WordNet class may not have the same functions as mine so the test shown will probably not work verbatim with
your code. Note that my test does NOT use an NGramMap anywhere, nor is it using a HyponymHandler, nor is it directly
invoking an object of type Graph. It is specifically tailored to testing the WordNet class. Relying on only
browser tests will be incredibly frustrating (and slow!). Use your JUnit skills to build confidence in the foundational
abstractions that you build (e.g. Graph, WordNet, etc.).
Design Tips #
This project involves having to do all sorts of different lookups, graph operations, and data processing operations. There is no one right way to do this.
Some example lookups that you might need to perform:
- Given a word (e.g. “change”), what nodes contain that word?
- Example in synsets16.txt: change is in synsets 2 and 8
- Given an integer, what node goes with that index?
- Necessary for processing hyponyms.txt. For example in hyponyms16.txt, we know that the node with synset 8 points at synsets 9 and 10, so we need to be able to find node 8 to get its adjacency list.
- Given a node, what words are in that node?
- Example in synsets16.txt: synset 11 contains alteration, modification, and adjustment
Some example graph operations you might need to perform:
- Creating a node, e.g. each line of synsets16.txt contains the information for a node.
- Adding an edge to a node, e.g. each line of hyponyms16.txt contains one or more edges that should be added to the corresponding node.
- Finding reachable vertices, e.g. the vertices reachable from vertex #7 in hyponyms16.txt are 7, 8, 9, 10.
Your life will be a lot easier if you select instance variables for your classes that naturally help solve all six of the problems above.
Some example data processing operations:
- Given a collection of things, how do you find all non-duplicate items? (Hint: There is a data structure that makes this very easy and efficient). Don’t be afraid to also Google documentation for the data structure that you choose (e.g. if you choose to use a TreeMap for whatever reason, feel free to look up “TreeMap methods java”, “Map methods java”, or “Collection methods java”, etc).
- Given a collection of things, how do you sort them? (Hint: Google how to sort the collection that you’re using)
Also, a reminder from proj2a: Deeply nested generics are a warning sign that you are doing something too complicated. Either find a simpler way or create a helper class to help manage the complexity. For example, if you find yourself trying to use something like Map<Set<Set<…, you have started a walk down an unnecessarily difficult path.
As usual, if you have a design that is painful and with which you cannot make progress, don’t be afraid to delete your existing instance variables and try again. The hard part of this project is the design, not the programming. You can always use git to recover your old design if you decide you actually liked it.
Handling Lists of Words #
Your next task is to handle lists of words. As an example, if the user enters “change, occurrence” for the diagram
below, we should only return common hyponyms of each word,
i.e. [alteration, change, increase, jump, leap, modification, saltation, transition]. “Demotion” and “variation” are not
included because they are not hyponyms of both words; specifically, they are not hyponyms of “occurrence”.
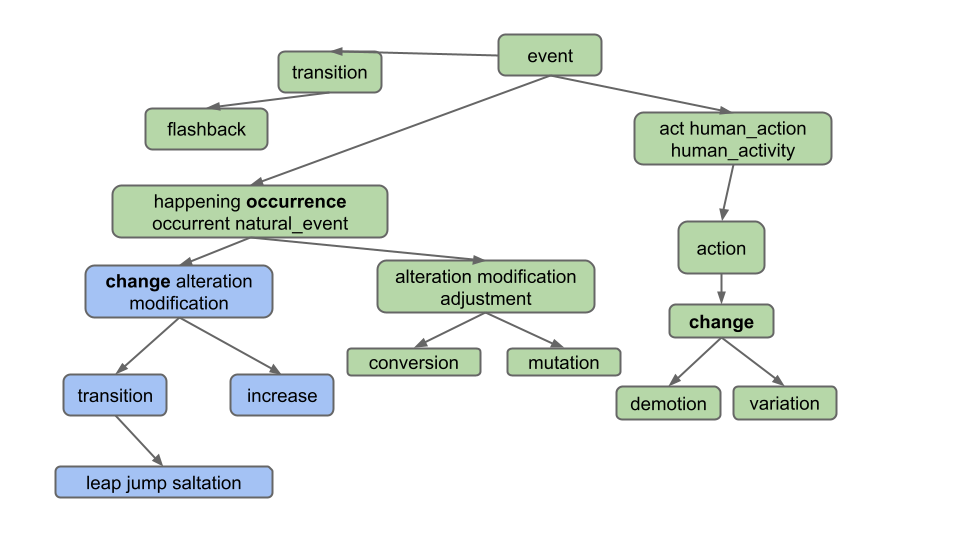
As you can see, we only want to return words which are hyponyms of ALL words in the list. Furthermore, note that the list of words provided by the user can include more than just 2 words, even though our examples in this spec do not.
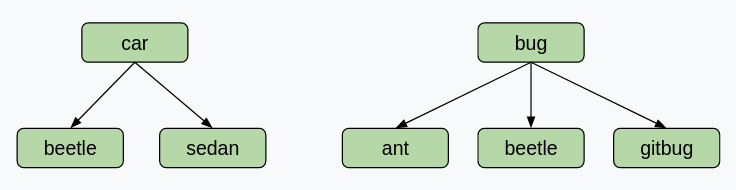
Note that it is possible for two words to share hyponyms without necessarily sharing nodes. Take a look at this example. If the user enters “car, bug” for the diagram below, we should get [beetle], not [] (empty list)! This example shows that we are getting the intersection of words, not nodes.
For some more examples which demonstrate the usefulness of this feature, let’s say we are using the full synsets.txt and
hyponyms.txt.
- Entering “video, recording” in the words box and clicking “Hyponyms” should display
[video, video_recording, videocassette, videotape], as these are all the words which are hyponyms of “video” and “recording”. - Entering “pastry, tart” in the words box and then clicking “Hyponyms” should display
[apple_tart, lobster_tart, quiche, quiche_Lorraine, tart, tartlet ].
Task: Modify your HyponymsHandler and the rest of your implementation to deal with the List of Words case.
To test this part of your code, we recommend manually constructing examples using synsets16.txt and hyponyms16.txt
and using the provided front end to evaluate correctness.
Handling k != 0 #
Above, we handled the situation where k = 0, which is the default value when the user does not enter a k value.
Your final required task is to handle the case where the user enters k. k represents the maximum number of hyponyms
that we want in our output. For example, if someone enters the word “dog”, and then enters k = 5, your code would
return exactly 5 words.
To choose the 5 hyponyms, you should return the k words which occurred the most times in the time range requested. For
example, if someone entered words = "food, cake", startYear = 1950, endYear = 1990, and k = 5, then you would
find the 5 most popular words in that time period that are hyponyms of both food and cake. Here, the popularity is
defined as the total number of times the word appears over the entire time period. The words should then be returned in
alphabetical order. In this case, the answer is [biscuit, cake, kiss, snap, wafer] if we’re
using top_49887_words.csv,
synsets.txt, and hyponyms.txt.
Note that if the front end doesn’t supply a year, default values of startYear = 1900 and endYear = 2020 are provided by
NGordnetQueryHandler.readQueryMap.
If k = 0, or the user does not enter k (which results in a default value of zero), then the startYear
and endYear should be totally ignored.
If a word never occurs in the time frame specified, i.e. the count is zero, it should not be returned. In other words,
if k > 0, we should not show any words that do not appear in the ngrams dataset.
If there are no words that have non-zero counts, you should return an empty list, i.e. [].
If there are fewer than k words with non-zero counts, return only those words. For example if you enter the word
“potato” and enter “k = 15”, but only 7 hyponyms of potato have non-zero counts, you’d return only 7 words.
Task: Modify your HyponymsHandler and the rest of your implementation to deal with the k != 0 case.
This task will be a little trickier since you’ll need to figure out how to pass information around so that the
HyponymsHandler knows how to access a useful NGramMap.
DO NOT MAKE A STATIC NGRAMMAP FOR THIS TASK! It might be tempting to simply make some sort of
public static NGramMap that can be accessed from anywhere in your code. This is called a “global variable”.
We strongly discourage this way of thinking about programming, and instead suggest that you should be passing an NGramMap to either constructors or methods. We’ll come back to talking about this during the software engineering lectures.
Tips #
- Until you use the autograder, you’ll need to construct your own test cases. We provide one
above:
words = "food, cake",startYear = 1950,endYear = 1990,k = 5. - When constructing your own test cases, consider making your own input files. Using the large input files we provide is extremely tedious.
- In the coming sections of this spec, we’ll tell you how to set up your code for submission to the autograder, and how to write your own JUnit tests to mimic the test cases provided by the grader.
Deliverables and Scoring #
For Project 2B, the only required deliverable is the HyponymsHandler.java file, in addition to any helper classes.
However, we will not be directly grading these classes, since they can vary from student to student.
Project 2B will be worth 3200 points. The points will be split as follows:
- Basic Case, k = 0 (40%): Correctly handle queries with a single word when
k = 0. - List of Words, k = 0 (20%): Correctly handle queries with multiple words when
k = 0. - Handling k != 0 (40%): Correctly handle queries with either a single word or multiple words when
k != 0.
Testing Your Code #
We’ve provided you with two short unit test files for this project in the proj2b_testing directory:
proj2b_testing/TestOneWordK0Hyponyms.javaproj2b_testing/TestMultiWordK0Hyponyms.java
The two provided test files correspond to the first two cases that you solved in this project, that is:
- Finding hyponyms of a single word where k = 0.
- Finding hyponyms of multiple words where k = 0 (e.g.
gallery, bowl).
These test files are not comprehensive; in fact, they each only contain one sanity check test. You should fill
each file with more unit tests, and also use them as a template to create two new test files for the respective cases
where k != 0.
Task: Fill out the provided unit test files for the k = 0 cases, and then write similar tests for the
k != 0 case.
If you need help figuring out what the expected outputs of your tests should be, you should use the two tools that we linked in the Getting Started section.
Debugging Tips #
- Use the small files while testing! This decreases the startup time to run
Main.javaand makes it easier to reason about the code. If you’re runningMain.java, these files are set in the first few lines of themainmethod. For unit tests, the file names are passed into thegetHyponymHandlermethod. - You can run
Main.javawith the debugger to debug different inputs quickly. After clicking the “Hyponyms” button, your code will execute with the debugger - breakpoints will be triggered, you can use the variables window, etc. - There are a lot of moving parts to this project. Don’t start by debugging line-by-line. Instead, narrow down which function/region of your code is not working correctly then search more closely in those lines.
- Check the FAQ for common issues and questions.
Submitting Your Code #
Throughout this assignment, we’ve had you use your front end to test your code. Our grader is not sophisticated enough
to pretend to be a web browser and call your code. Instead, we’ll need you to provide a method in the
proj2b_testing.AutograderBuddy class that provides a handler that can deal with hyponyms requests.
When you ran git pull skeleton main at the start of this spec, you should have received a file called AutograderBuddy.java
Open AutograderBuddy.java and fill in the getHyponymHandler method such that it returns a HyponymsHandler
that uses the four given files. Your code here should be quite similar to your code in Main.java.
Now that you’ve created proj2b_testing.AutograderBuddy, you can submit to the
autograder. If you fail any tests, you should be able to replicate them locally as JUnit tests by building on the test
files above. If any additional datafiles are needed, they will be added to this section as links.
Partnership Submissions #
The token limiting policy for this project will be as follows:
- You and your partner will each start with 4 tokens that have a 24 hour refresh time.
- At 10:00PM on March 24th (3 hours before the deadline), you and your partner will each be reset to 4 tokens, each of which have a 15 minute refresh time.
- At 12:00AM on March 25th, you and your partner will each again be reset back to 4 tokens with a 24 hour refresh. This policy will remain in place for the remainder of the semester.
You may submit to either your own or your partner’s Gradescope accounts. We strongly recommend that you use both partner’s accounts to submit, in order to maximize the number of autograder tokens that your group has access to.
- When submitting to the autograder, be sure to add your partner as a Group Member in the top right corner.
- When assigning you a score for this project, we will use the score of the most recent Gradescope submission that you are a part of (either a submission that you made to your own Gradescope, or one that you were added to on your partner’s Gradescope).
Optional Extra Features #
If you’d like to go above and beyond in this project (and even explore some front-end development), read through the Optional Features spec!
To get “The Lamp”, you should correctly implement the hypohist button as described on this page AND you should also pick one interesting feature of your choosing, which may be one of three options listed above (an additional button, a new field d, a new ! operator), or anything else of your choosing. Create a public or unlisted youtube video and fill out this form
Acknowledgements #
The WordNet part of this assignment is loosely adapted from Alina Ene and Kevin Wayne’s Wordnet assignment at Princeton University.