FAQ #
The FAQ for Lab 05 is here.
Setup #
Follow the
assignment workflow instructions
to get the assignment and open it in IntelliJ. This assignment is lab05.
Introduction #
In this lab, you will take a deeper dive into git and also learn some advanced debugging techniques with another exercise. By the end of this lab, you should feel much stronger about the git workflow, and your debugging skills should be more refined!
A playlist with some videos that may be helpful for this lab is available here.
Git Background #
In this part, you may watch a series of videos that explain the major concepts of git, and then get some hands-on practice using git. We’ve already practiced git before in lab01 (and we have an awesome git guide), so feel free to watch these as you are doing the lab, or skip them if you feel comfortable.
We no longer use checkout in 61B (instead replacing it with restore and
switch), so the following videos are a bit out-of-date. However, they are still
useful for learning the basics of how git works!
These videos talk more about how git works, and are optional for this lab.
- Git Intro - Part 1
- Git Intro - Part 2
- Git Intro - Part 3
- Git Intro - Part 4
- Git Intro - Part 5
- Git Intro - Part 6
In particular, you should understand the following concepts:
- Local git workflow:
git addandgit commit - Updating files with
git restore - Remote repositories, e.g. those hosted on GitHub
- Local git integration with remote repositories:
originandskeleton - How to resolve merge conflicts
If you have any questions about the above concepts, you can reference our git guide and the Git WTFS (Git Weird Technical Failure Scenarios – get your mind out of the gutter!), or you can always feel free to ask your TA to clarify concepts.
We will warn you here: be wary of git information that you find online, since not all of it comes from trusted sources. Also, be sure to NEVER copy commands you find online or get from friends with git when you are stuck, unless you really, really know what you’re doing - always ask your TA when you are in doubt.
And remember, we also have our git guide and guide on merging as resources!
Git Exercise #
This exercise has a lot of steps, and it’s important you follow each one carefully. If you run into trouble at any moment, ask on Ed or come into lab/OH for help.
If you prefer a video format, a walkthrough for most of this exercise is available here.
-
Pull the skeleton code as described in the assignment workflow instructions, if you haven’t already.
-
After pulling the skeleton code, run
git push origin main(yes, even before doing any work on the lab). Make sure to commit your code before you push! -
Navigate to your GitHub repo online (https://github.com/Berkeley-CS61B-Student/sp23-s****) and go to the
lab05folder (if you can’t find it, be sure you’ve completed step 2). Then, click on thesrcandconflictfolders, and then click onhello.txt. You should see the following:
- Click the pencil icon on the right-hand side to edit the file.
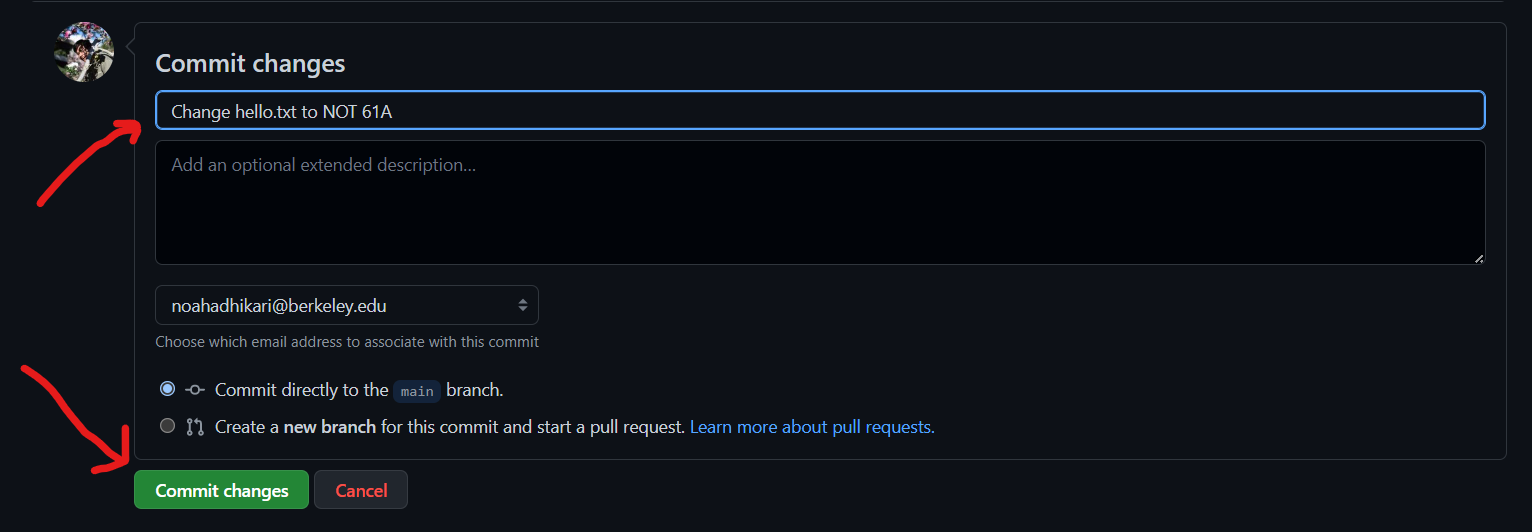
Change the contents of the file to be
Hello, I am NOT a 61A student!and then scroll to the bottom of the page. Change the commit message from “Update hello.txt” to “Change hello.txt to NOT 61A” and click the green “Commit changes” button.
- Now, open up
hello.txtlocally (in your terminal editor, IntelliJ, or something else). You should still see the original contents (Hello, I am a 61A student!). This time, change the file to readHello, I am a 61B student! -
Add and commit this change locally (i.e., not on GitHub!) with the message “Change hello.txt to 61B”.
- Now, try to
git pushyour code from the terminal, as you usually would to submit your work. You should see an error like the following (you may have seen something like this before):! [rejected] main -> main (fetch first) error: failed to push some refs to 'https://github.com/Berkeley-CS61B-Student/sp23-s****.git' hint: Updates were rejected because the remote contains work that you do hint: not have locally. This is usually caused by another repository pushing hint: to the same ref. You may want to first integrate the remote changes hint: (e.g., 'git pull ...') before pushing again. hint: See the 'Note about fast-forwards' in 'git push --help' for details.This occurs because git is extremely hesitant about overwriting changes. You don’t yet have the latest version of the file that the remote has (“NOT 61A”), so if you pushed your local commits, the “NOT 61A” version of the file would be lost!
The following step will introduce a merge conflict. If you have experience with this sort of thing, you may be tempted to resolve it right away. Don’t do that yet!
-
To resolve this, run
git pull origin mainto integrate the remote’s changes with your local changes. Oh no, git is saying something about a conflict! You should have gotten a message like the following:Auto-merging lab05/src/conflict/hello.txt CONFLICT (content): Merge conflict in lab05/src/conflict/hello.txt Automatic merge failed; fix conflicts and then commit the result.If you now inspect the contents of
hello.txt, you should see something like<<<<<<< HEAD Hello, I am a 61B student! ======= Hello, I am NOT a 61A student! >>>>>>> 538409c19b3d2dafccd3e8b0c16449662e78de04Don’t panic! This is a common occurrence, especially when working with others. Git does its best to integrate your changes (“61B”) with the remote’s changes (“NOT 61A”), but it isn’t always smart enough to figure out how to do so automatically. In this case, git has identified a conflict in
hello.txt, and doesn’t know which version to keep. We’ll learn how to resolve this in a bit, but don’t edit anything yet!The text between
<<<<<<< HEADand=======is the version of the file in your “HEAD” commit, git’s shorthand for your most recent local commit. The text between=======and>>>>>>> 538409c...is the version of the file in the remote’s commit538409c.... These two versions are incompatible, so git edits our file with these strange conflict markers to let us know that we need to resolve the conflict manually.In this case, the conflict involves the entire file, but in practice, conflicts will only involve a small portion of the conflicted file. Git is smart enough to only mark the lines that are in conflict and leave the rest of the file alone.
At this point, the output of
git statusshould look similar to this:$ git status On branch main Your branch and 'origin/main' have diverged, and have 1 and 1 different commits each, respectively. (use "git pull" to merge the remote branch into yours) You have unmerged paths. (fix conflicts and run "git commit") (use "git merge --abort" to abort the merge) Unmerged paths: (use "git add <file>..." to mark resolution) both modified: src/conflict/hello.txt -
If you run
tests/conflict/ConflictTest, you should now passtestConflictExists. You will still be failingtestConflictResolved, but that’s okay - we’ll come back to it later.(If you are failing
testConflictExistsbut are sure you’ve done everything correctly, refer to the FAQ.) - Usually, you would resolve the merge conflict first, and then commit the
result. However, for this lab, we want to make sure you actually got a merge
conflict! Run the following commands in the terminal, from the
lab05/directory:$ git add src/conflict/hello.txt $ git commit -m "Merge conflict still present" -
You should now
git pushas usual and submit your code to Gradescope. If everything goes smoothly, your submission should tell you some hidden directions on exactly how to resolve the merge conflict and proceed with the assignment. - Resolve the conflict using the directions stated by the autograder. You
should now be passing all tests in
ConflictTest.
Task: Carefully follow the steps above to introduce and resolve a merge conflict.
Congratulations, you’ve successfully resolved a merge conflict! In real-world code, the merge conflicts you encounter may be much more complex, but the general idea is the same - your changes are incompatible with the remote’s changes, and you need to reconcile them manually.
Another Debugging Puzzle?! #
In Lab 02, we learned how to use the IntelliJ debugger. In this lab, we’ll learn some more handy features of the debugger, and use it to solve a puzzle!
Do not modify Puzzle.java!
These exercises will involve working with code that may seem quite cryptic and unfamiliar. Enforce the abstraction barriers and try to find the answers without having to understand exactly what is going on!
Exception Breakpoints #
When debugging, you may sometimes run into an unexpected error, making it difficult to figure out what is wrong with your code. To help with this, IntelliJ allows you to set breakpoints on exceptions. These ensure that when your code throws an exception, the debugger will pause execution and allow you to inspect the state of your program.
Go ahead and run the Puzzle class. You should see the following output:

For many common exceptions, IntelliJ will indicate a “Create breakpoint” button
in the console output (just to the right of java.lang.RuntimeException in the
above screenshot), which will allow you to access the advanced breakpoint
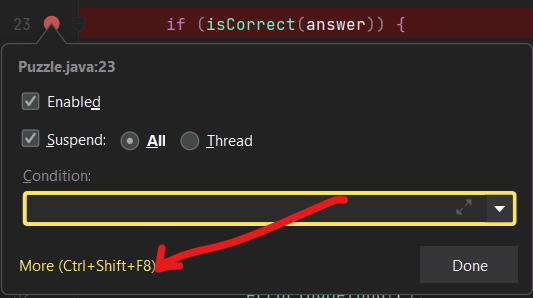
window. To access it without this button, create a breakpoint on any line (in
the following screenshot, we’ve created a breakpoint on line 23), right-click
it, and select “More”.
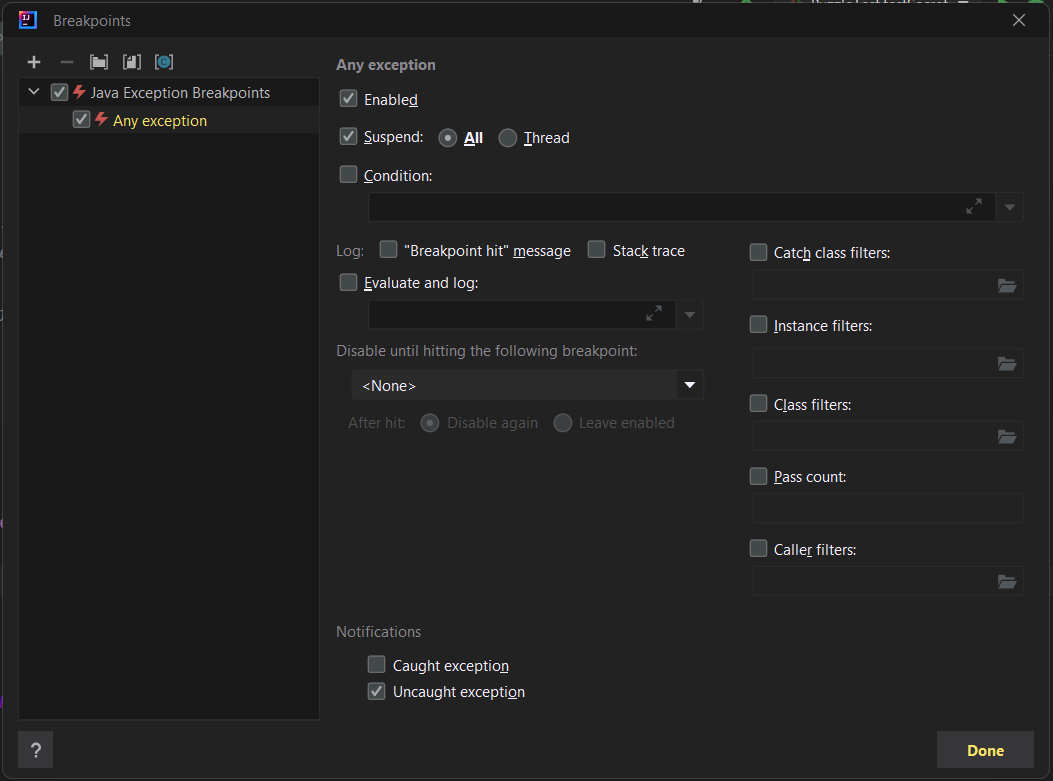
The advanced breakpoint window should look something like this:
There’s a lot going on here, but you don’t need to understand most of it. Click the plus symbol in the top-left corner, and you should see a popup like this:
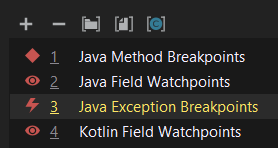
Select “Java Exception Breakpoints”, and another window will appear where you
can specify the type of exception for which we want to pause execution. The
console told us that we were getting a java.lang.RuntimeException, so go ahead
and select that.

You should now see the original advanced breakpoint window, with a newly created exception breakpoint aptly named ‘java.lang.RuntimeException’ (if you used the console’s “Create breakpoint” button to access the window, you may see two copies of this, and that’s okay).
You will have the option to break on caught or uncaught exceptions, or both. This can be useful because a lot of library code intentionally throws and catches a lot of exceptions, so this allows us to focus on the unhandled ones if necessary. For now, go ahead and leave both options checked.
If you debug the program at this point, your code should pause on line 53, with a little lightning bolt symbol in place of the usual red circle. This indicates that the breakpoint was triggered by an exception, rather than a normal breakpoint.

From this, we can see that IntelliJ is hinting that the problem may be in
src/puzzle/answer.txt. By inspecting that file, poking around Puzzle.java,
and using other debugging techniques you learned in Lab 02, can you figure out what’s
going on?
Task: Fix answer.txt so that Puzzle no longer throws a RuntimeException.
Feel free to look at the hint if you’re stuck!
Hint
The issue is that Puzzle.java parses answer.txt for an integer guess, and
doesn’t find any, so it throws an exception. To fix this, replace the TODO line
of answer.txt with any integer.
After fixing the bug, run Puzzle again. You should now see the following
output:

Read the error message and see if you can find the answer! If you’ve got it
correct, Puzzle.java will no longer error and you should pass testPuzzle
inside of tests/puzzle/PuzzleTest.
Task: Replace the value in answer.txt so that Puzzle no longer errors.
Expressions and Watches #
When debugging, you may not always have the value that you want to inspect stored in a variable. Luckily, IntelliJ has a solution for us! Once paused on a certain line, you can use the “Evaluate Expression” tool (shaped like a calculator). You can click on the calculator icon to open up a whole new window, but you can also just type the expression into the debugger directly:

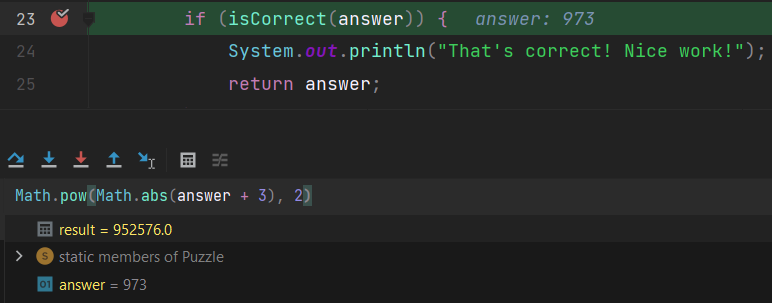
You can use variables and method calls with this tool too! Even though we’ve
only used Math library methods in the following example, you can call anything
you want. Here, we are using the tool in Puzzle.java with an initial answer
guess of 973:
After you resume the program, result will be lost. If you don’t want to lose
it, you can use Ctrl+Shift+Enter (Windows) or Cmd+Shift+Enter (Mac) to add it as
a watch. This will keep it around even after you continue execution. Moreover,
watches will change value accordingly with the program, just like normal
variables would!
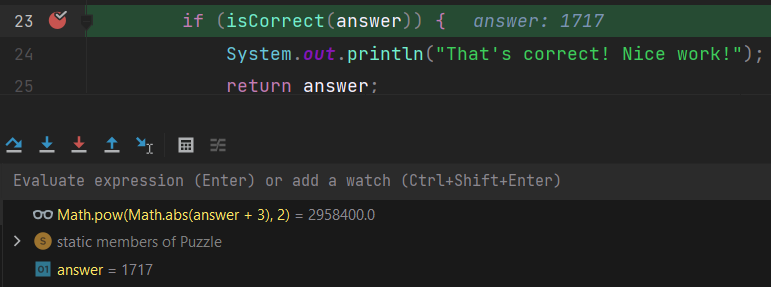
Watches will persist even after you stop and rerun your program, so they can be
very useful for debugging over multiple executions. As an example, I’ve changed
my guess from before to be 1717 and reran the program entirely, but didn’t
have to re-evaluate the expression for the debugger to tell me what it was!
A Secret Challenge #
At this point, you should have one more failing test, testSecret (there is no
associated Java file for this test). We’re being intentionally vague and not
telling you what testSecret does. In the real world, you often need to figure
out what poorly documented code is doing, and the debugging skills you’ve
learned over the past three labs will prove immensely helpful!
While you’re debugging, you may find the exception breakpoint from the last exercise to be quite annoying. Feel free to open up the advanced breakpoints window again to disable or delete it.
Note: As a reminder, you don’t necessarily need to know what’s going on with the code - embrace the beauty of abstraction and let the tools work their magic!
Task: Debug testSecret directly (in PuzzleTest) and figure out what to put in secret.txt such that you pass the test.
Hint: Watches and the expression evaluator will likely be helpful here!
Once you’re done with that, congratulations, you have finished Lab 05!
Deliverables and Scoring #
The lab is out of 256 points. There are no hidden tests on Gradescope. If you pass all the local tests, you will receive full credit on the lab (unless you modified things you weren’t supposed to modify).
- Create a merge conflict in
conflict/hello.txt(64 pts) - Resolve the merge conflict appropriately in
conflict/hello.txt(64 pts) - Find a correct value for
puzzle/answer.txt(64 pts) - Find a correct value for
puzzle/secret.txt(64 pts)
Submission #
Just as you did for the previous assignments, add, commit, then push your Lab 05 code to GitHub. Then, submit to Gradescope to test your code. If you need a refresher, check out the instructions in the Lab 1 spec and the Assignment Workflow Guide.